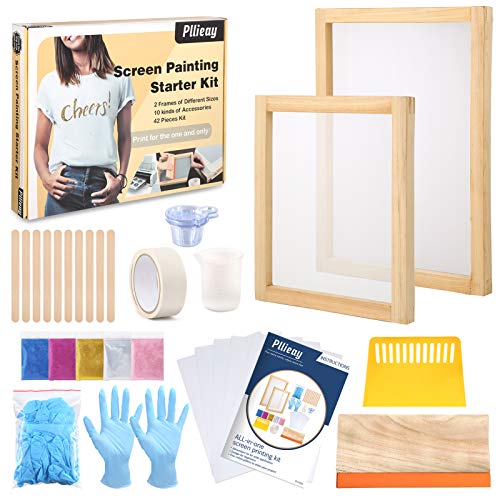
Silk Screen Printing Supplies: A Practical Guide
Silk screen printing, also known as screen printing, is a versatile way to transfer designs onto materials such as fabric, paper and wood. Whether you are setting up a home studio or expanding a professional workshop, having the right supplies makes the process easier and helps you achieve consistent results.
Essential screen printing supplies
Screen and frame
The screen is made from mesh stretched across a frame. Frames are commonly made from wood or aluminium. Mesh count—the number of threads per inch—affects how much ink passes through the screen. A lower mesh count is often suitable for thicker inks and bold designs, while a higher count can help reproduce finer detail.
Squeegee
A squeegee pushes ink through the open areas of the screen and onto the material beneath. Choose one that is slightly wider than the design, with a comfortable handle and a blade suited to your project. Blade hardness can influence how much ink is deposited: softer blades generally lay down more ink, while firmer blades offer greater control for detailed work.
Ink
Screen-printing inks are available for different surfaces and processes. Fabric inks may be water-based or plastisol, while paper and other materials often require inks formulated for those substrates. Check the manufacturer’s guidance for drying or curing requirements, colour compatibility and suitable materials before printing.
Emulsion and exposure equipment
To create a reusable stencil, photosensitive emulsion is applied to the screen, dried and exposed to light with a film positive in place. The unexposed areas are then washed out to reveal the design. You will need emulsion, a scoop coater, a suitable light source or exposure unit, and a way to control light exposure.
Registration and printing equipment
Registration tools help align the screen with the material, particularly when printing multiple colours. A simple tabletop hinge clamp can be useful for small projects, while a press may be preferable for larger or more frequent print runs. A platen or flat printing surface helps keep the substrate in position.
Useful extras
- Substrate: the fabric, paper or other surface you plan to print on.
- Masking tape: useful for sealing screen edges and covering unwanted areas.
- Mixing tools: spatulas and palettes help you stir and blend inks.
- Test material: spare fabric or paper lets you check registration, ink flow and colour before printing the final item.
- Cleaning supplies: screen wash, emulsion remover and suitable cloths help maintain screens and tools. Always follow product instructions.
- Protective equipment: gloves and eye protection may be appropriate when handling particular inks or cleaning products.
How to choose supplies
Start by considering what you want to print, how often you will print and how detailed your designs are. A beginner printing simple designs on T-shirts will have different requirements from a studio producing fine artwork on paper. Check that your screen mesh, ink and substrate are compatible, and read the technical information supplied with each product.
It can be tempting to buy a large kit straight away, but a small, well-matched selection is often a better starting point. A screen, squeegee, suitable ink, basic exposure materials and a few test substrates are enough to learn the process. You can add specialist equipment as your projects develop.
Care, safety and storage
Clean screens and tools promptly after use, using products designed for the ink and emulsion you have chosen. Dried ink can be difficult to remove and may block the mesh. Store screens flat or upright in a clean, dry place, and keep inks sealed according to the manufacturer’s recommendations.
Work in a well-ventilated area and follow the safety information on inks, emulsions and cleaning products. Avoid pouring ink or chemicals down the drain unless the product guidance specifically permits it. Good organisation and careful cleaning can extend the life of your equipment and make each print run more reliable.
Getting started
Silk screen printing supplies range from simple hand-printing tools to complete studio systems. Choosing equipment that suits your materials, designs and working space will help you build confidence and produce better results. Begin with the essentials, practise on test pieces and refine your setup as you gain experience.
8 Essential Tips for Choosing and Using Silk Screen Printing Supplies
- Choose mesh count to suit your design detail.
- Use a sturdy frame to keep the mesh taut.
- Pick water-based ink for easy clean-up.
- Use a squeegee slightly wider than your artwork.
- Keep emulsion and screens away from light.
- Wear gloves when handling inks and chemicals.
- Have a scoop coater for smooth emulsion layers.
- Clean screens promptly after each print run.
Choose mesh count to suit your design detail.
Choose a screen mesh count to match the level of detail in your design. A lower mesh count lets more ink pass through and is generally suited to bold graphics and thicker inks, while a higher count can capture finer lines and detail by allowing less ink through. Consider the ink and material you are using, and test your choice before starting a full print run.
Use a sturdy frame to keep the mesh taut.
Choose a sturdy frame to keep the mesh taut during printing. A stable frame helps maintain even tension, making it easier to control the squeegee and transfer ink consistently. It can also reduce the risk of the mesh shifting or sagging, helping you achieve cleaner, more reliable prints.
Pick water-based ink for easy clean-up.
Choose water-based ink if you want a simpler clean-up after printing. It can usually be washed from screens and tools with water before it dries, helping to keep your workspace tidy and reducing the need for stronger cleaning products. Always check the manufacturer’s instructions, and clean your equipment promptly for the best results.
Use a squeegee slightly wider than your artwork.
Choose a squeegee slightly wider than your artwork so it can cover the full design in a smooth, even pass. This helps distribute ink consistently across the screen and reduces the risk of missed areas or uneven edges. A squeegee that is much wider than necessary can be harder to control, so aim for just enough extra width to extend beyond both sides of the image.
Keep emulsion and screens away from light.
Keep photosensitive emulsion and coated screens away from light until you are ready to expose them. Store emulsion in its original container in a cool, dark place, and let coated screens dry in a light-safe area. Limiting exposure to ambient or direct light helps prevent the emulsion from hardening prematurely, so your stencil can wash out cleanly and reproduce the design as intended.
Wear gloves when handling inks and chemicals.
Wear gloves when handling screen-printing inks, emulsions and cleaning chemicals to help protect your skin from irritation and unwanted stains. Choose gloves that are suitable for the products you are using, and check their labels for safety guidance. Replace them if they become torn or heavily soiled, and wash your hands after removing them.
Have a scoop coater for smooth emulsion layers.
A scoop coater helps you apply a smooth, even layer of emulsion to your screen—an important step for creating clean, consistent stencils. Choose a coater that fits the width of your screen and keep it clean to avoid bumps or streaks. Apply the emulsion steadily, following the product instructions, then let the screen dry completely in a clean, dark space before exposing it.
Clean screens promptly after each print run.
Clean your screens promptly after each print run to prevent ink drying in the mesh and blocking the fine openings. Remove excess ink first, then use a screen-cleaning product suited to your ink, following the manufacturer’s instructions. Rinse the screen thoroughly and let it dry completely before storing it in a clean, dry place. Regular care helps preserve the mesh and keeps your screen ready for the next project.