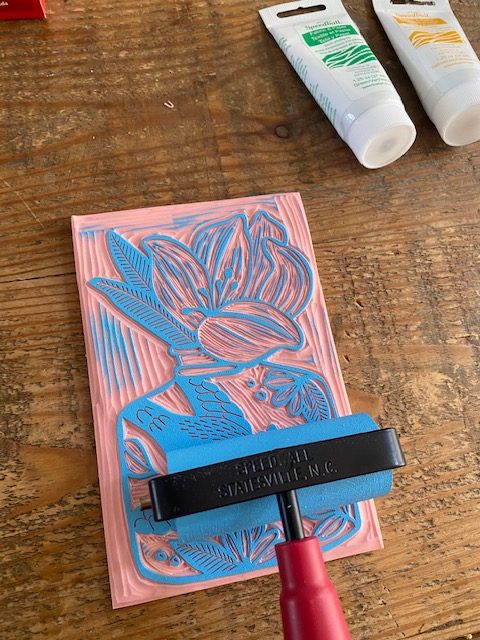
Block Printing Ink: Choosing and Using the Right Ink
Block printing ink is made for relief printing: a process in which an image is carved or cut into a block, ink is rolled across its raised surface, and the block is pressed onto paper or fabric. Choosing the right ink can make a noticeable difference to the print’s colour, detail, texture and durability.
What is block printing ink?
Unlike paint, which is usually brushed onto a surface, block printing ink is designed to be spread in a thin, even layer with a roller, also known as a brayer. The ink should cling to the raised areas of the block without filling its carved lines. When pressure is applied, it transfers the image to the printing surface.
Block printing inks are generally formulated for particular materials and working methods. The two main types are water-based and oil-based inks, with specialist options available for printing on fabric.
Types of block printing ink
Water-based ink
Water-based ink is popular with beginners, schools and home studios. It is usually easy to roll out and can be cleaned from tools with soap and water while still wet. It often dries more quickly than traditional oil-based ink, which can make it convenient for short sessions and simple projects.
Its quick drying time can also be a drawback: ink left on the block or roller may become tacky before printing is finished. Work in manageable batches, and follow the manufacturer’s instructions for keeping the ink workable. Water-based ink for paper is not necessarily suitable for fabric.
Oil-based ink
Oil-based relief ink is valued for its smooth handling, rich colour and ability to hold fine detail. It often stays workable for longer than water-based ink, giving the printer more time to prepare and print a series of images.
Cleanup depends on the specific product. Some oil-based inks can be cleaned with soap and water, while others require a suitable cleaner. Check the label before use, work in a well-ventilated area where advised, and dispose of cleaning materials responsibly. Do not assume that all oil-based inks require solvents—or that all can be washed away with water.
Fabric block printing ink
Fabric inks are formulated to adhere to textiles and withstand handling and, in some cases, washing. Results depend on the fabric, ink and curing method. Many fabric inks need to be heat-set or left to cure for a specified period. Always follow the product instructions, and test the ink on a spare piece of the same fabric before printing a finished garment or textile.
How to choose an ink
Before buying, consider the surface you plan to print on, the level of detail in your design, your preferred cleanup method and how quickly you need the print to dry. Also check the ink’s recommended blocks and materials: products may be intended for lino, wood, soft-cut materials, paper or textiles.
- For paper prints: choose an ink labelled for relief or block printing on paper.
- For fabric: use a textile ink and follow its curing and washing instructions.
- For fine detail: select an ink that rolls out smoothly and is designed to retain crisp lines.
- For easier cleanup: check whether the ink can be washed from tools with soap and water, and clean up promptly.
How to use block printing ink
- Prepare your workspace. Protect the table, gather your block, roller, ink, paper or fabric, and have cleaning materials to hand.
- Dispense a small amount. Put a little ink on a smooth, non-absorbent surface such as a glass or acrylic slab. It is easier to add more than to remove excess.
- Roll the ink out. Move the roller back and forth until the ink forms a thin, even layer. A soft, tacky sound is often a useful indication that the ink is ready.
- Ink the block. Roll over the raised surface with light, even passes. Avoid forcing ink into the carved areas.
- Make the print. Position the paper or fabric carefully, then apply steady pressure by hand, with a baren or using a suitable press.
- Lift and dry. Peel the material away carefully and leave the print to dry or cure according to the ink maker’s instructions.
Common problems and how to solve them
Blurry or filled-in lines: There may be too much ink on the block, or too much pressure may have forced it into the carved areas. Use less ink and roll it out more evenly.
Patchy coverage: The block may not be evenly inked, or the printing pressure may vary. Check that the roller is coated consistently and apply steady pressure across the whole design.
Ink dries too quickly: This can happen with some water-based inks, particularly in a warm or dry room. Work in smaller batches and follow the product’s guidance for maintaining the ink’s working time.
Prints smudge: The ink may need more time to dry, or the paper may have shifted during printing. Leave prints undisturbed on a flat surface and handle them only when they are dry to the touch.
Storage and safety
Close ink containers promptly and store them as directed on the packaging. Keep inks and cleaning products away from children, food and drink, and avoid contact with eyes and skin. Wash hands after printing, even when using products labelled non-toxic. That label does not mean an ink is safe to eat or suitable for food-contact surfaces.
With the right ink, a small amount of practice and careful preparation, block printing can produce prints that range from bold, expressive marks to crisp and intricate designs. Start with a test print, adjust the amount of ink and pressure, and keep a note of what works for future projects.
9 Essential Tips for Using Block Printing Ink
- Use ink designed for your printing surface.
- Roll out a thin, even layer of ink.
- Aim for a smooth, tacky surface, not a puddle.
- Use a clean roller for each colour.
- Test the ink on scrap paper first.
- Add ink gradually to avoid filling fine details.
- Keep the block and work surface clean.
- Clean tools promptly using the recommended method.
- Store ink tightly sealed, away from heat.
Use ink designed for your printing surface.
Choose an ink designed for your printing surface, as paper and fabric inks are formulated to adhere and dry differently. Using the right type helps produce clearer, more even prints and improves how well the image lasts. For fabric, check whether the ink needs heat-setting or a curing period, and test it on a scrap piece first.
Roll out a thin, even layer of ink.
Roll out a thin, even layer of block printing ink on a smooth, non-absorbent surface before inking your block. Use a brayer with light, steady passes until the ink coats the roller evenly and feels slightly tacky. A thin layer helps transfer the design cleanly, while too much ink can fill carved lines and blur fine details.
Aim for a smooth, tacky surface, not a puddle.
When rolling out block printing ink, aim for a smooth, even layer with a slight tackiness—not a puddle. Too much ink can seep into the carved areas, blurring fine lines and leaving prints heavy or smudged. Roll out a small amount at a time until the surface looks consistent and the roller makes a soft, tacky sound, then apply a light, even coat to the raised parts of the block.
Use a clean roller for each colour.
Use a clean roller for each colour to keep your inks bright and prevent them from becoming muddy. Even a small amount of leftover ink can alter a new colour, so dedicate a roller to each shade or clean the roller thoroughly between colours. This is especially important when printing pale colours after dark ones.
Test the ink on scrap paper first.
Before printing your final design, test the ink on a piece of scrap paper. This lets you check the colour, coverage and level of detail, while spotting whether the ink is too thick, too thin or unevenly applied. You can then adjust the amount of ink or pressure before working on your finished paper.
Add ink gradually to avoid filling fine details.
Add block printing ink gradually, rolling out a small amount at a time until it forms a thin, even layer. Too much ink can seep into the carved grooves and fill fine details, leaving the print blurred or less defined. If the raised surface looks evenly coated without excess ink collecting around the edges, it is ready to print.
Keep the block and work surface clean.
Keep the block and work surface clean to prevent dust, dried ink and scraps from spoiling your print. Wipe away any excess ink between impressions, and remove debris from the block’s raised areas before rolling on a fresh, even layer. A tidy surface also helps stop unwanted marks transferring to your paper or fabric. Use cleaning methods suitable for your ink and block, and make sure everything is dry before printing again.
Clean tools promptly using the recommended method.
Clean your roller, printing block and work surface promptly after each session, before the ink has a chance to dry and become harder to remove. Use the cleaning method recommended on the ink’s packaging: some inks wash off with soap and water, while others need a specific cleaner. Follow the product’s safety guidance, and dry your tools thoroughly before storing them to help keep them in good condition.
Store ink tightly sealed, away from heat.
Store block printing ink in its original container with the lid tightly sealed to prevent it drying out or becoming contaminated. Keep it in a cool place, away from radiators, direct sunlight and other sources of heat, and always follow the storage guidance on the label.